

Header art drawn by the amazing Sylvium!
A few people have been asking me how did I host a onion site on the dark web, so I wanted to make a short guide on how to set up your own Onion, and if you want, how to set up a Tor Relay too!
If you did not know already, I love Tor and I host several relays. I think it is one of the best tools for privacy and security on the internet. It is a great way to bypass firewalls and access whatever you want, and it is also a cool way to host a website! You get ultimate bragging rights to say you have a .onion site, right? So let’s get started!
Setting up your own Hidden service
Before you do anything, you will need two basic things, a server and a website. If you do not have a website, make one rahhh!!! If you do not have a server, you can get one from IncogNet, Crunchbits, Kyun, or any other hosting provider that you like. I will also assume you have a basic understanding of how to use a terminal, as that is what we will be using for most of this guide.
The server setup
Tor does not require much but a few things that are recommended is to have at least 512 MB of memory and decent bandwidth depending on the amount of traffic you are expecting.
If you want exact numbers, currently the server that hosts my Onion site is also running a Tor Relay. It currently has 8 GB of memory (completely overkill) with 8 TB of bandwidth each month. Again, this setup is really excessive and not needed. You can get away with a $5 DigitalOcean droplet.
Making a Tor-friendly site
There seems to be one thing that people forget about Tor, everyone using it is paranoid and hates modern tech. So if you build your Tor site with React or any other Javascript-first framework without a fallback, you are going to have problems. Most Tor users have Javascript disabled and will not enable it for anything, so it is important to either do all of your rendering server side or to build a more basic site.
Another common mistake people make is having overly complex websites. Tor is not the fastest thing in the world, so make it lightweight and fast. If you have a massive site that has to download 100 full-res images to see anything, you are going to have a bad time. No one wants to wait 5 hours for your site to load.
Just by having your site be clean and simple, you will make it much more usable on Tor!
Oh yeah, let’s also install Tor
For the sake of this guide, I will assume you are using Ubuntu as it is pretty much the standard and also the easiest for beginners.
But because Ubuntu is Ubuntu, the default package lists are frequently out of date, so you would want to add the Tor Project’s official package repos, good thing this is pretty easy.
First, install apt transport by running this command:
apt install apt-transport-httpsNext, we will need to know our CPU architecture and distribution code name, so run these two commands
dpkg --print-architecture
lsb_release -c
For your CPU architecture, it should return either amd64, arm64, or i386. If it returns anything else, Tor is most likely not supported on your system. You will need to find a different way to host your Onion.
As for your distribution code name, you will need it for the repos you will add to your sources, so let’s get that done.
Create a new file at /etc/apt/sources.list.d/tor.list and add these lines:
deb [signed-by=/usr/share/keyrings/deb.torproject.org-keyring.gpg] https://deb.torproject.org/torproject.org distroname main
deb-src [signed-by=/usr/share/keyrings/deb.torproject.org-keyring.gpg] https://deb.torproject.org/torproject.org distroname main
Replace distroname with the single-word codename returned by the lsb_release command.
Next you have to add the GPG key that will sign the packages by running this command:
wget -qO- https://deb.torproject.org/torproject.org/A3C4F0F979CAA22CDBA8F512EE8CBC9E886DDD89.asc | gpg --dearmor | tee /usr/share/keyrings/deb.torproject.org-keyring.gpg >/dev/nullNow finally let’s install Tor and the keyring updater.
apt update && apt install tor deb.torproject.org-keyringIf everything works, you did it! You have installed Tor! Now let’s get it set up.
Let’s hop on Tor now!
I will use nginx for this guide since I like it. If you have your own solution, feel free to use it. I know many people like to use Apache as it is also easy to setup.
nginx setup
I will make another assumption that you are hosting a static HTML website with nothing really fancy. If you are, cool! If not, most likely you will not need nginx. You can just add whatever port your site is hosted on later, so just skip this section.
Now that we got all the nerds away, let’s get nginx setup. Run these commands in your terminal:
# Install Nginx
apt install -y nginx
mkdir -p /var/www/onionsite
# Now place your files in /var/www/onionsite/ folder
# Here is an example command that would do that for you
cp -r /path/to/site/* /var/www/onionsite/
Ok now we have to tell nginx to serve your site, run nano /etc/nginx/sites-available/onionsite or use vim if you are like that. Then just paste the config below into the file
server {
  listen 127.0.0.1:80;
  server_name onionsite;

  root /var/www/onionsite;
  index index.html;

  location / {
    try_files $uri $uri/ $uri.html /404.html;
  }
}
Then to really tell nginx to do its job, run these commands:
sudo ln -s /etc/nginx/sites-available/mysite /etc/nginx/sites-enabled/
sudo nginx -t  # nginx will tell you here if you goofed up
sudo systemctl restart nginx
If you get no errors, you are all set! Your server is now hosting your site locally on port 80. You want to host it locally so that only Tor can access it, if you just set it to listen 80; then anyone could access it and could potentially find out the server IP. So now let’s tell Tor to put this on an Onion now.
Who is Cutting Onions?
nvm, that was a bad joke.
Open up the Tor config file using nano /etc/tor/torrc and add the lines below. If you want, delete everything in the file, as you will most likely not need it.
HiddenServiceDir /var/lib/tor/hidden_service/
HiddenServicePort 80 127.0.0.1:80
This will tell Tor to start a hidden service that serves whatever is at port 80. If your stuff is hosted at a different port, simply change the port listed and it should work. To save your changes, restart Tor by running sudo systemctl restart tor.
Next, get your randomly generated Onion address by running cat /var/lib/tor/hidden_service/hostname and you should see your Onion address. It should look something like this:
nesquik@echonet-hm2 > cat /var/lib/tor/hidden_service/hostname
insertverycooloniondomainherethatiskindalong.onion
Now you can go fire up Tor Browser and check out your site! If you see your site, congrats! You have successfully set up your own Onion service!
What now?
Well, now that you have an Onion up and running, you have to advertise it! One of the best ways to do this is by adding your Onion link to your site or anywhere else.
The Tor browser also scans for the header Onion-Location on all normal websites (referring to non-onion sites), which allows people accessing your website via Tor to find your Onion link more easily. You can do this by setting it as an HTTP header or using an HTML
If you are using nginx, add this to your server block:
add_header Onion-Location http://insertverycooloniondomainherethatiskindalong.onion$request_uri;And if you would like to use a HTML
tag, add this near the top of the page:<meta http-equiv="onion-location" content="http://insertverycooloniondomainherethatiskindalong.onion" />So that is how to set up your own Onion service! You can host anything you want on it!
Spare bandwidth?
If you have some spare bandwidth and want to help out the Tor network, you can set up a Tor Relay! Tor is powered by volunteers who donate their bandwidth to the network, so if you have some to spare, you can help out too!
When you decide to run a Relay, there are many things you must consider: where will this relay be hosted? What type of Relay will I run? Will my hosting provider and/or ISP allow this? Am I practicing good operational security? These are all questions you will have to answer for yourself.
At the end of this section, I will attach different resources from the Tor Project, Electronic Frontier Foundation, and Riseup, which include information on running Onion services, Tor Relays, and other helpful things. I will mostly outline some important things, but as always, DO YOUR OWN RESEARCH. With that out of the way, let’s talk about the different types of relays.
Layers of the Onion.
When you boot up the Tor browser, it connects to various servers to give you a “Circuit”. In most cases, this will follow the pattern below. The number of active middle relays might change, but the three major parts of your circuit are the guard, middle, and exit relays.
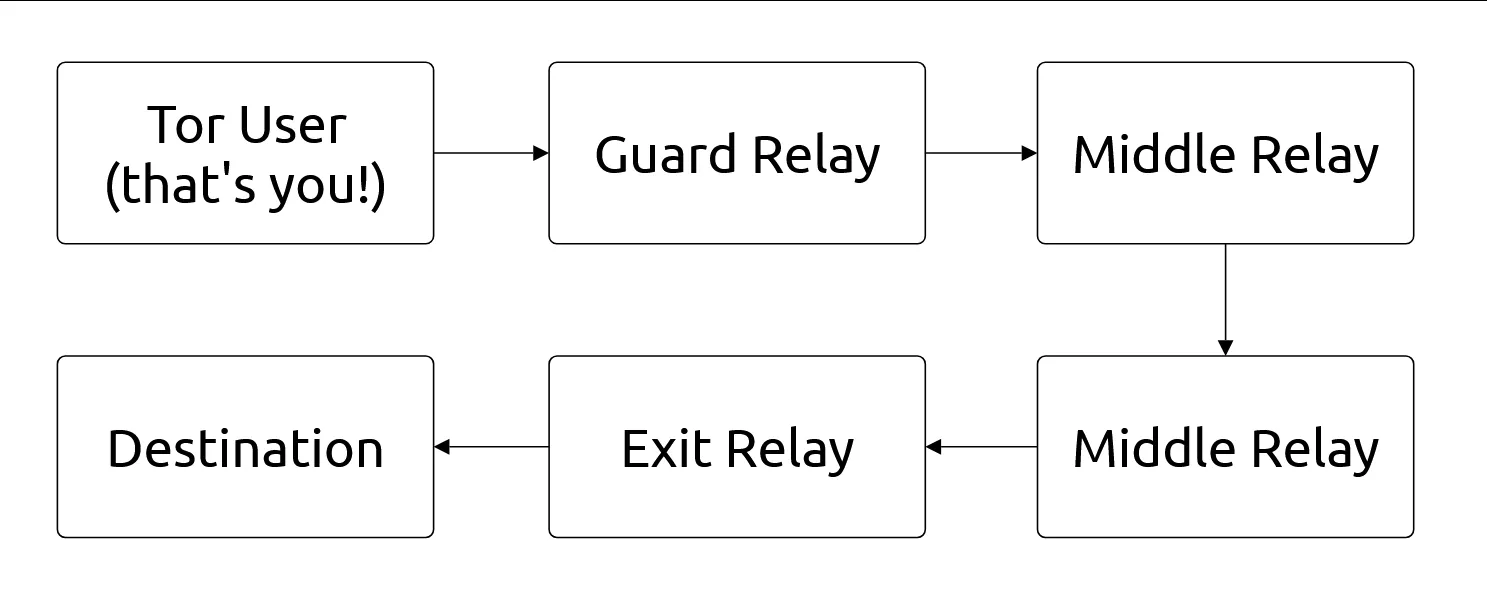 Flow chart showcasing the structure of a Circuit
Guard and Middle Relays are the easiest to run. Most likely, you will not get any abuse complaints, and it is the easiest and safest way to contribute to the network. It is relativity fine to run this type of relay out of your home. Guard Relays are the first relay in a Circuit, which means they are the first to see the user’s IP address. Middle Relays are the middle relay in a Circuit, which means they do not see the user’s IP address or the IP address of the services they are connecting to. When you first start running a relay, it will start out as a Middle relay, over time it will become more trusted and become a Guard relay. Guard/Middle relays is the most common relay and it is recommended for people who are new to running a relay.
Exit Relays are the final relay in a Circuit, which means all the services it is connecting to will see the IP address of that relay. Now, this would be fine, but if someone starts torrenting the latest Disney movie, that IP will be the one hit by the DMCA. Any abuse complaints will be sent to that IP (via your hosting provider, ISP, whatever). This is why it is only recommended for people who can handle law enforcement inquiries and abuse complaints. As any experienced Tor user will tell you, “Do not run an Exit Relay out of your house”. You will get a knock on the door from your ISP or, even worse, the police. If you do not want to deal with these issues, stick with running a Guard or Middle Relay.
Preflight checklist
Let’s talk about those questions you should ask before you host a relay and some other things you should consider.
Where will this relay be hosted?
If you are hosting a exit relay out of your house, please don’t. Even experienced relay operators will tell you it is not very smart. If you are running a non-exit relay out of your house, that is fine, you should be fine. Keep in mind it will be public so if you have anything that can be linked back to you, you might want to reconsider.
If you are using a hosting provider, that’s cool, but let’s also talk about AS diversity on the Tor network.
Autonomous System or AS is just a fancy way of saying a network of computers. For example, Linode (also known as Akamai) is an AS, and its ASN is AS63949. This number identifies their servers across the internet. This is the same with providers like OVH (AS16276) and Hetzner (AS24940).
One of the most important points of the Tor is to be decentralized, so if 80% of all Tor Nodes are hosted in Hetzner data centers, that is a single point of failure. If Hetzner goes down, then the Tor network will be majorly impacted. Currently, out of all relays online, 11% of them are hosted by Hetzner. While that still is small, it is a number that should not grow. So try to run a relay on another provider with a smaller percentage. If Hetzner is the only option, you are fine to run a relay on it. Running a relay on a big AS is better than not running one at all. If you want to get a sense of the amount of which providers have the most control over the network, you can check out metrics.torproject.org
What type of relay will I run?
For most people, this will be just a Guard/Middle relay. It is the easiest and generally hassle-free.
If you are planning to run an Exit Relay, make sure you have done your research. Having templates that you can use to respond to abuse complaints is very helpful. The Tor Project made a good blog post about running an exit node which I highly recommend reading: Tips for Running an Exit Node. The Tor Project also provides a few templates based on different situations that you can use: Tor Abuse Templates
Will my hosting provider and/or ISP allow this?
It depends on the provider, but most providers will say yes to Guard and Middle Relays and no on Exit relays. Even then, make sure you explicitly ask them, “Am I allowed to run a Tor Relay on your services? If so, which types?” If you make a relay and they do not allow them on their platform, they have every right to cancel your service without a refund, so please make sure you ask them first.
Am I practicing good operational security?
Hopefully, but this is not just a case of you being okay once and never checking again. Check yourself often. One of the mistakes people often make is running an illegal Onion service on the same server where they are running a relay that has their personal email listed for contact. If you are hosting something legally dubious, make sure there is nothing else on that server that could possibly link it to you. I plan on covering opsec in a later blog post, but just be aware of what you put out there.
Joining the Onion
Ok, we made sure our provider is fine with us hosting a relay, we have figured out what type of relay we want to host, and everything is all good! So let’s get started.
First, make sure you have Tor installed. You can scroll up to where I talk about installing Tor and running an Onion service. The directions are the same for that part.
There are some soft requirements for your relay, but there is no real punishment for failing these requirements, it will just mean your relay is used less often. The requirements mostly boil down to:
- At least 512MB of memory and 200MB of storage.
- At least 10MB/s of upload and download bandwidth, with more being better.
- At least 100GB of incoming and outbound traffic per month.
- A public IPv4 address that does not change often. Having it directly on the host is preferred, but using NAT or port forwarding is fine.
- Do not run more than two relays on the same IP. Ideally run only one relay per IP.
- Your relay should stay online 24/7, weekly reboots is fine, daily is pushing it. If it is going to only be online for a few hours a day, it is going to be less useful to the network. I recommend rebooting it weekly for updates.
That is pretty much it. Of course, better speeds, bandwidth, and uptime will make your relay be used more often as it is more reliable than a relay that goes down every few hours.
Now let’s get this thing going for real this time.
Open up the Tor config file using nano /etc/tor/torrc and add the lines below.
Nickname iLoveFurries # Change this
ContactInfo example AT example dot com # Change this (if you want)
ORPort 9001 # This is the port that Tor will use to connect to your relay
ExitRelay 0 # Set to 1 if you want to run an Exit Relay
SocksPort 0
ControlSocket 0
The nickname is only used to identify it, you can just put random letters if you want. As for contact info, you are not required to fill this out; you can just leave it as an example if you really want to. If you do decide to put your email, make sure you obfuscate it by replacing the @ symbol with the word “AT” and whatnot. This will prevent your email from getting scraped and bombarded with spam.
Next, restart Tor using sudo systemctl restart tor and your changes will take effect.
What now? X2
Yeah, that was kinda anticlimactic, but if you like seeing what is actually going on with your relay, there is this cool tool called Nyx! What it allows you to do is see the traffic going through your relay. To install it, just run this command in your terminal:
sudo apt-get install nyxThen, run nyx, and you will see the CLI interface.
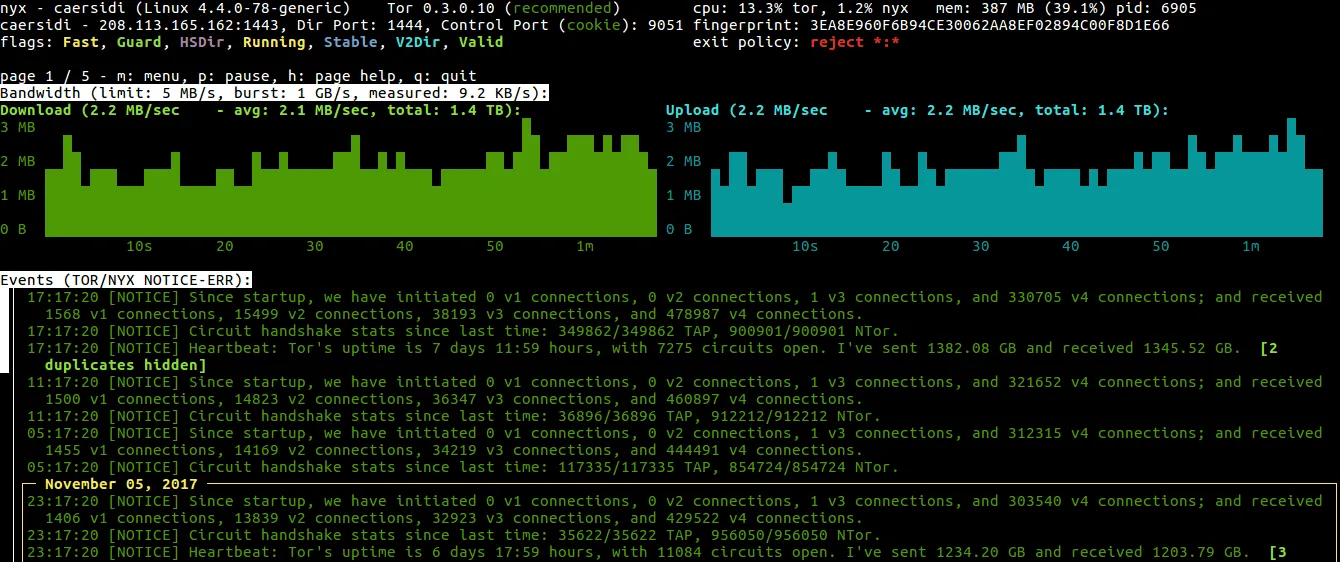 Screenshot of Nyx running on a relay. Image courtesy of the Tor Project
After your relay has been online for at least 3 hours, you can also search it up on Tor Metrics to see other fun facts about it.
I would also recommend reading this helpful article that gives you some steps to take once you are done setting up your relay: Relay Post-install and good practices
Nothing is happening!
The network still has to figure out your relay and its capacity. You will not be hit with tons of traffic as soon as you set up your node. It will take a few weeks for it to be put under any heavy load. You should start seeing traffic roll in after your node has been online for 2 weeks. If you are interested in how this process works, the Tor Project made a blog post about it: The lifecycle of a new relay
Conclusion
If you decide to run a hidden service, welcome to the club! If you choose to run a relay, welcome! Thank you for helping people all over the world evade censorship! However you decide to contribute to the Tor network helps! Thank you Sylvium for making the header art for this blog post. Thank you to Entropy, Lucid.H3X, nyx, Some dude with a dog, lucid (driving), Piplup7575, Kamil the golden cat, and others who helped me with copyediting this post and giving me feedback.
Thanks for reading my silly blog, good luck, have fun and don’t get caught :3
Other cool resources
In this post, I covered a few things about Tor. While some of this is based on personal experience, a lot is from reading articles and hearing what other people say, so here are some links to things you can go check out! Some of these are different guides, some are just cool things to look at.
- Join the Tor Community - community.torproject.org
- Tor Project Help - support.torproject.org
- Tor Mailing lists - lists.torproject.org
- Best Practices for Hosting Onion Services - riseup.net
- r/TOR - redlib.tux.pizza
- Legal FAQ for Tor Relay Operators - eff.org
- TorMap - tormap.org
- nusenu/ansible-relayor An Ansible Role for Tor Relay Operators - github.com
- Emerald Onion - emeraldonion.org
- Noisebridge Tor (aka NoiseTor) - noisebridge.net